 is live now • Soundtrack your videos

 Home
Home

Most new podcasters don’t quit because recording is hard. They quit at editing — staring at a waveform, dragging little handles around, three hours into a forty-minute episode, wondering if this is really the hobby they signed up for.
Here’s the good news, and it’s the whole point of this guide: you need far less editing than you think, and the part that used to need an audio engineer now takes minutes. The goal of a podcast edit isn’t a flawless studio master. It’s a clean, listenable episode that respects your listener’s time — and there’s a simple, repeatable workflow that gets you there every week without the dread.
We call it CLEAN: Cut the mistakes, Lift the dead air, Erase noise and fillers, Add music, Normalize and export. Five steps, same order every episode. Do them once and you’ll never stare at a blank timeline again.
How much editing does a podcast actually need?
Less than the internet makes you believe. A conversational show needs the mistakes removed and the sound cleaned up — that’s it. A narrative or heavily-produced show needs more, but that’s a style choice, not a requirement.
The trap is over-editing: chasing every breath, every half-second pause, every “so.” It burns hours and, past a point, makes a show sound sterile — listeners bond with a human voice, not a robot. Edit for clarity, not perfection.
Rule of thumb: if an edit doesn’t make the episode clearer or shorter, skip it. Your goal is “clean and human,” not “surgically silent.”
The CLEAN workflow at a glance
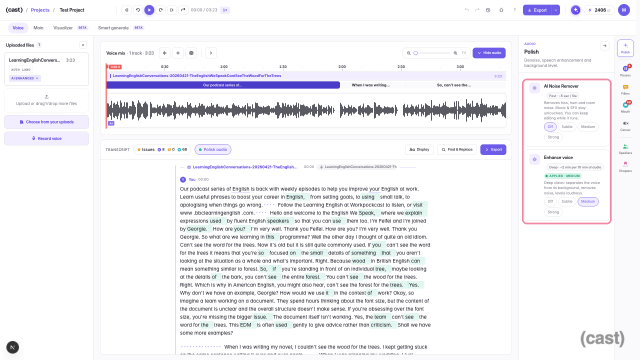
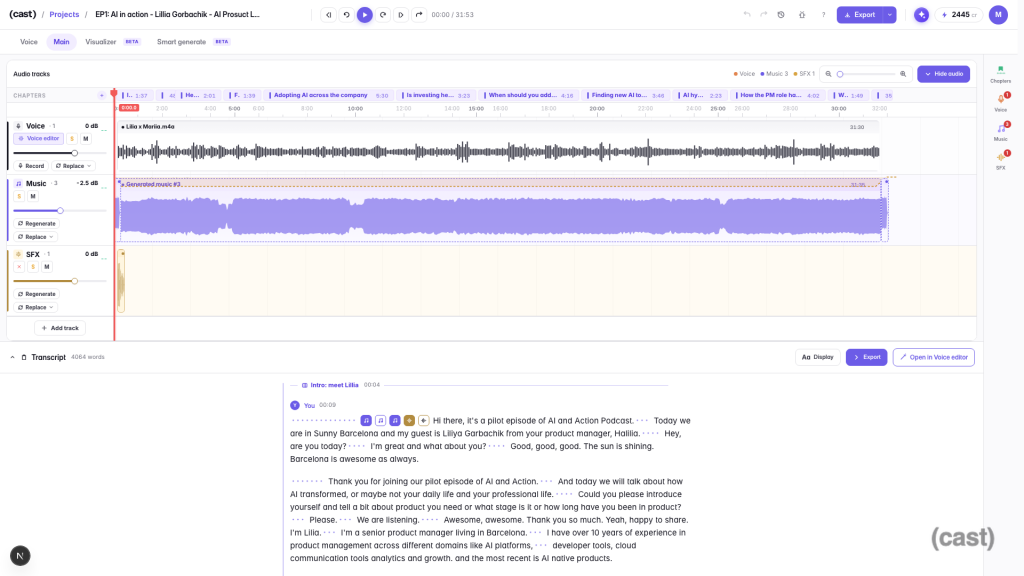
Every step below is shown inside Cast — Mubert’s browser podcast studio, and the app in every screenshot in this guide. Cast edits by transcript, which is what makes most of these steps a matter of minutes rather than hours. (Prefer a free desktop editor? Audacity does all of this too — the manual way; there’s an honest comparison at the end.)
Before you start: import and keep a copy
Bring your recording in, and keep the original untouched. Non-destructive editing — where your cuts are a layer over the raw file, not baked into it — means a mistake is never permanent and you can always get a word back. Cast is non-destructive by default; if you’re in a tool that isn’t, work on a duplicate.
One more setup habit: skim the whole episode once before you cut anything, so you know where the good stuff and the dead spots are. Five minutes of listening saves twenty of aimless scrubbing.
C — Cut the mistakes
This is where most of your time goes, and where text-based editing changes the game.
Start with the top and tail: trim the throat-clearing and “okay, are we recording?” at the front, and the “…did we get that?” at the end. Then remove the fluffed lines, false starts, and dead tangents in the body.
In a waveform editor you’d hunt for these by eye and ear. In Cast you read the transcript and delete the words like it’s a document — the audio comes out with them. Highlight the botched sentence, press delete, and it’s gone from the episode, seam closed.
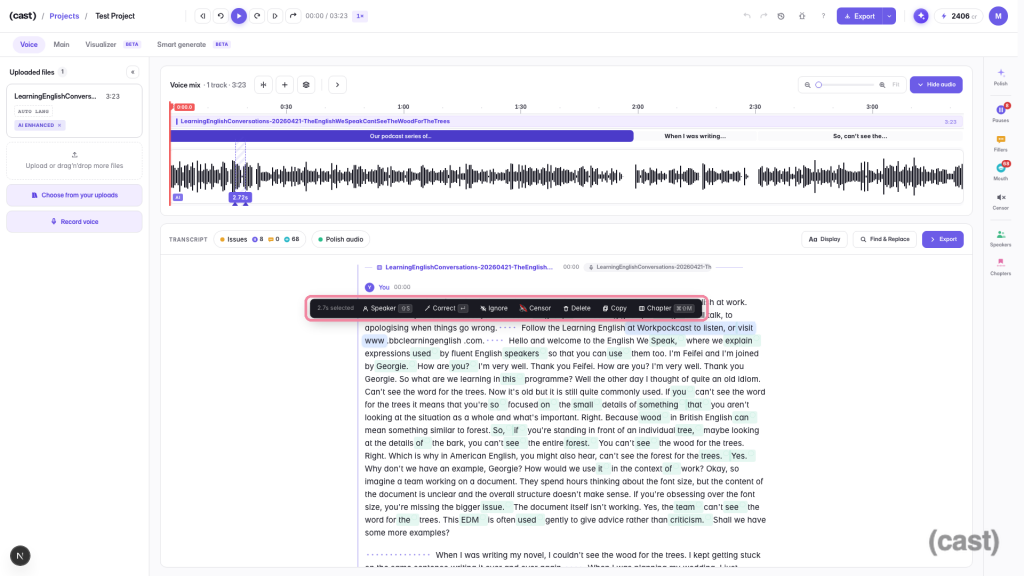
Remember the two-second silence you left after each flub while recording? This is where it pays off — it’s a flat, obvious gap you can jump straight to. Cut the bad take, keep the good one.
Rule of thumb: cut anything that makes you wait, wince, or lose the thread. Leave the rest — including a few natural “you knows.” Real beats polished.
L — Lift the dead air
Pacing is the invisible edit. A show with long gaps feels slow even when the content is great; tightening the pauses is often the single biggest jump in perceived quality.
You’re not removing every pause — a beat before a punchline or a hard point is doing work. You’re clipping the too-long ones: the three-second silence while someone finds their thought, the gap where you took a sip of water. Cast surfaces the long pauses so you can tighten or remove them in a pass, rather than scrubbing for each.
Rule of thumb: keep intentional pauses, cut the accidental ones. If a silence isn’t doing a job, shorten it to a breath.
E — Erase noise and fillers
Two quick cleanups that do more for “sounds professional” than any expensive mic.
Noise. Room hum, a laptop fan, the low hiss of a cheap interface — a single noise-reduction pass lifts your voice out of the murk. In Cast it’s one enhance step that removes the background and evens out your volume; no EQ curves to learn.
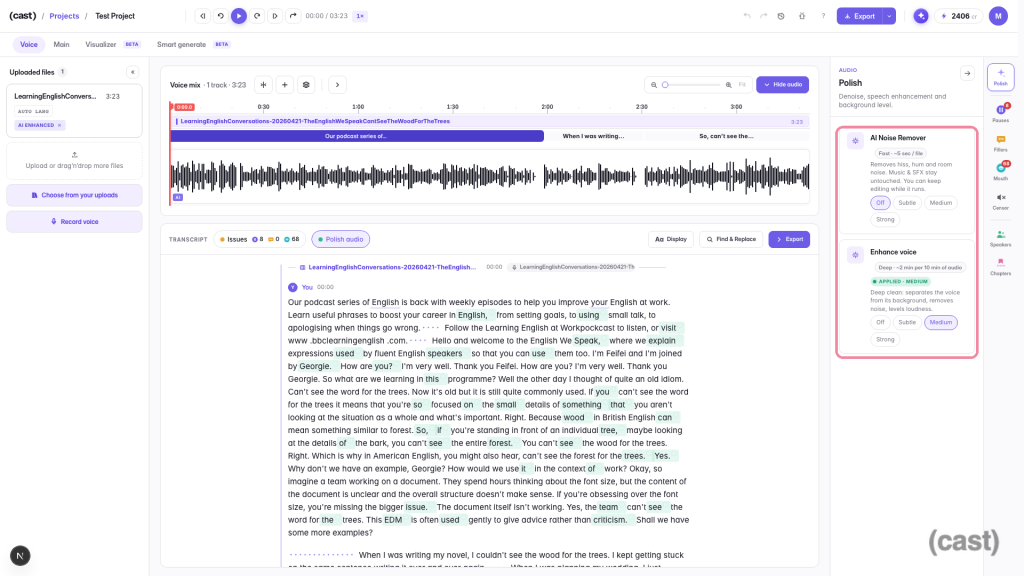
Fillers. “Um,” “uh,” “like,” “you know” — a few are human, a hundred are a slog. Cast finds them across the whole episode and strips them in one pass, so you’re not chasing each one down the timeline. Leave a light sprinkle in; wiping every last one is how you cross into robotic.
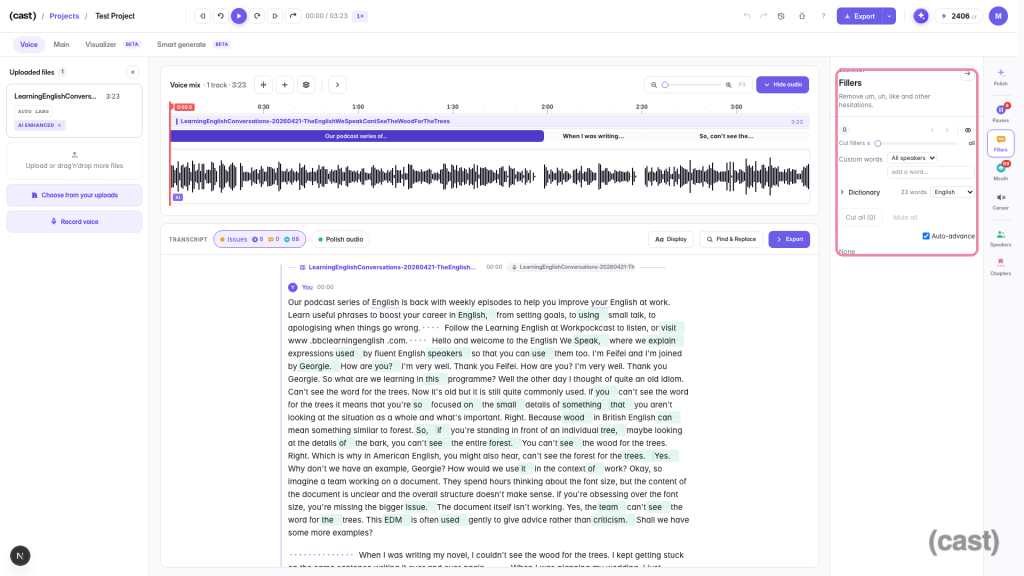
(Going deep on cleanup? The Cast docs walk through noise removal and filler cutting step by step — this section is the overview.)
A — Add music, ducked under your voice
Music turns a recording into a show: a short intro that brands the open, an outro under your sign-off, and an optional bed under narration. Keep the intro short — 5–10 seconds as a sting — because listener drop-off is steepest in the first minute, and a long musical intro sits right in that window.
The trick that separates amateur from pro here isn’t the music itself — it’s ducking: the music dips automatically whenever you speak and swells back in the gaps, so it supports your voice instead of fighting it. In a manual editor you’d draw volume keyframes by hand along the whole track. In Cast the bed arrives already ducking under speech — no fader-riding.
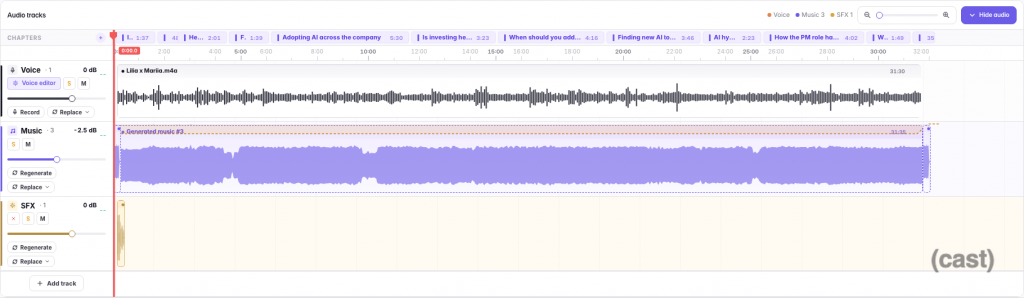
Where does the music come from? Pull a royalty-free track from a library — start with our guide to choosing background music for your podcast, which also covers how loud a bed should sit and where — or generate a bed to your episode’s exact length with Mubert Render’s podcast themes.
Rule of thumb: a short intro, a ducked bed, a resolving outro — built from one musical idea. Consistency is what makes it a theme instead of “music I found.”
N — Normalize and export
The last step is the one beginners skip and directories notice.
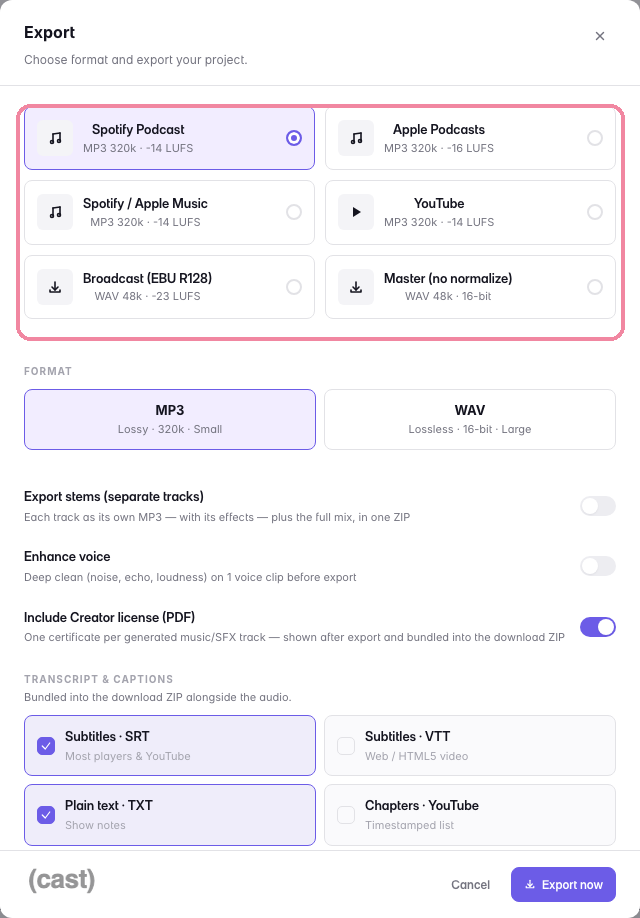
Normalize the loudness. Podcast apps expect a consistent level so your show isn’t jarringly quieter or louder than the next one in the queue. Apple Podcasts’ official audio requirements specify -16 LUFS (±1 dB) with a true peak no higher than -1 dBTP; Spotify normalizes to around -14 LUFS. You don’t need to hit those by hand — Cast exports at a directory-ready level with a preset, so the number is taken care of.
Export ready to publish. Render an MP3 and, in the same pass, grab an auto-generated transcript or captions — good for accessibility, good for SEO, and the raw material for your launch-day audiogram. Editing, transcription, and MP3 export don’t cost credits on any Cast plan; the full breakdown lives in the Cast docs.
How long should editing a podcast take?
Once your workflow is set, a 40-minute conversational episode is a 60–90 minute edit — and a good chunk of that is just listening. If you’re spending four or five hours, you’re almost certainly over-editing (chasing every breath and filler) rather than working the CLEAN steps in order.
The fastest wins are structural, not fiddly: cutting a rambling three-minute tangent does more for the episode than removing thirty individual “ums.” Edit big-to-small — whole segments first, words last.
Text-based vs. manual editing: an honest comparison
There’s no wrong answer — Audacity has launched thousands of great shows for $0. But if the editing dread is what’s stopping you from publishing, text-based editing removes most of it.
The 7 most common podcast editing mistakes
Avoid these and your edit is already ahead of most new shows:
- Over-editing. Chasing every breath, “um,” and micro-pause until the show sounds robotic. Edit for clarity, not silence.
- Skipping loudness normalization. Publishing at a random level so the episode is jarring next to other shows. Export to -16 LUFS (Apple) / -14 LUFS (Spotify).
- Music that fights the voice. A bed at full volume, or with lyrics, burying your words. Duck it, and use instrumental tracks.
- A long musical intro. Thirty seconds of music before you speak, sitting right where listeners bail. Keep it to a 5–10 second sting.
- Editing destructively. Working on the only copy of the file, so a mistake is permanent. Keep the original; edit non-destructively.
- Fiddly-first instead of big-first. Removing individual “ums” before cutting a rambling three-minute tangent. Cut whole segments first, words last.
- No fixed workflow. Reinventing the process every episode. Run the same sequence — like CLEAN — in the same order, every time.
FAQ
How do I edit a podcast for free?
Audacity is free on every platform and does cutting, noise reduction, and mixing manually. Cast has a free plan where editing, transcription, and MP3 export don’t use credits — so you can cut, clean, and export an episode at no cost, with the transcript-based workflow instead of waveform surgery.
How long does it take to edit a podcast episode?
About 60–90 minutes for a 40-minute conversational episode once your workflow is set — much of it spent listening. Highly-produced narrative shows take longer by design. If you’re routinely spending four-plus hours, you’re over-editing rather than working a fixed sequence like CLEAN.
Do I need to remove every “um” and pause?
No — and you shouldn’t. A few fillers and natural pauses are what make you sound human; wiping every one makes a show feel robotic and sterile. Remove the excess and the ones that bury a point, and leave a light, natural sprinkle. Edit for clarity, not silence.
What’s the best software to edit a podcast?
There’s no single best — it depends on how you like to work. Audacity is the free, manual standard. Text-based editors like Cast and Descript let you edit by deleting words in a transcript and automate cleanup and music ducking, which is faster for most beginners. Pick one that does cut + clean + export and put your energy into episodes.
How do I make my podcast sound professional?
Three things carry most of the way: mic technique while recording, a single noise-reduction/enhance pass to remove hum and even out volume, and exporting at broadcast loudness (around -16 LUFS) so your level matches other shows. Add a short, consistent intro and a ducked music bed and you’re there — no expensive gear required.
Should I add background music to my podcast?
It’s optional but high-leverage: a short intro brands your show and a bed adds warmth under narration. The key is ducking — the music must dip under your voice, not compete with it. Keep intros to 5–10 seconds, use instrumental tracks so lyrics don’t fight your speech, and make sure the license covers commercial podcast use.
Can I edit a podcast on my phone?
Yes, for light edits — several apps handle trimming and basic cleanup, and Cast runs in a mobile browser. For a full CLEAN pass (transcript cutting, filler removal, music ducking, loudness export) a laptop is faster and less fiddly, but phone editing is a legitimate way to ship early episodes.
Getting started today
- Import your recording into your editor and keep the original safe.
- Do one listen-through, noting the tangents and dead spots.
- Run CLEAN in order — Cut, Lift, Erase, Add, Normalize — without backtracking.
- Time-box it. Give a 40-minute episode 90 minutes, then stop. Done beats perfect.
- Export at broadcast loudness with captions, and pull one 30-second clip for social.
The edit is the part that used to stop people. It doesn’t have to anymore.
Transcript-based cutting, one-pass cleanup, automatic ducking, and a directory-ready export — free to start. Then do it again next week.

AI Music Company
Mubert is a platform powered by music producers that helps creators and brands generate unlimited royalty-free music with the help of AI. Our mission is to empower and protect the creators. Our purpose is to democratize the Creator Economy.